坑边闲话 :ZFS 有千般好,但是将 Linux 安装在 ZFS 上仍颇具挑战性。GRUB 2 已支持引导 Linux on ZFS,但只有 Ubuntu 等胆大的发行版内置了 ZFS 启动支持,而 Debian 这种比较尊重开源许可的发行版并不支持。本文介绍使用 ZFSBootMenu 在 ZFS 文件系统上安装 Debian 的方法。注意,本方案仅适用于 x86 架构 。
1. 前期准备·
ZFSBootMenu 是一个专为 root-on-ZFS 设计的 Linux bootloader,它支持快照和磁盘加密。ZFSBootMenu 本质上是一个小型的、独立的 Linux 系统,它知道如何在 ZFS 文件系统中查找目标 Linux 系统的内核和 initramfs 镜像。当识别出合适的内核与 initramfs,ZFSBootMenu 会使用 kexec 命令启动该内核。
kexec
kexec 是 Linux 内核中的一个功能,它允许在不经过硬件重新引导的情况下直接加载并启动一个新的内核 。这可以显著加快内核的重启过程,因为跳过了固件(BIOS/UEFI)初始化和引导加载程序(如 GRUB)的加载阶段。
主要特点:
快速切换内核
通过直接加载内核到内存并跳过引导加载过程,实现内核的快速重启或切换。
适用于特殊场景
用于系统崩溃后加载调试内核(kexec-crash)。
用于快速部署更新的内核,减少停机时间。
不依赖硬件重启
不会重新初始化硬件(如 CPU 和设备),减少整个系统重启所需的时间。
1.1 准备 LiveCD 启动环境·
由于本文需要使用很多命令,所以建议用户先准备一个客户端电脑,可以远程连接到要安装操作系统的机器,方便输入命令。如果通过网页读博客,也可在目标机器上使用 Linux 桌面环境。
此外,要下载 Debian LiveCD 启动盘。普通的安装盘无法执行命令,不满足本文要求。
1.2 启动 LiveCD 并配置 SSH·
首先要注意,一定要以 UEFI 模式启动系统 。此步骤非常重要!
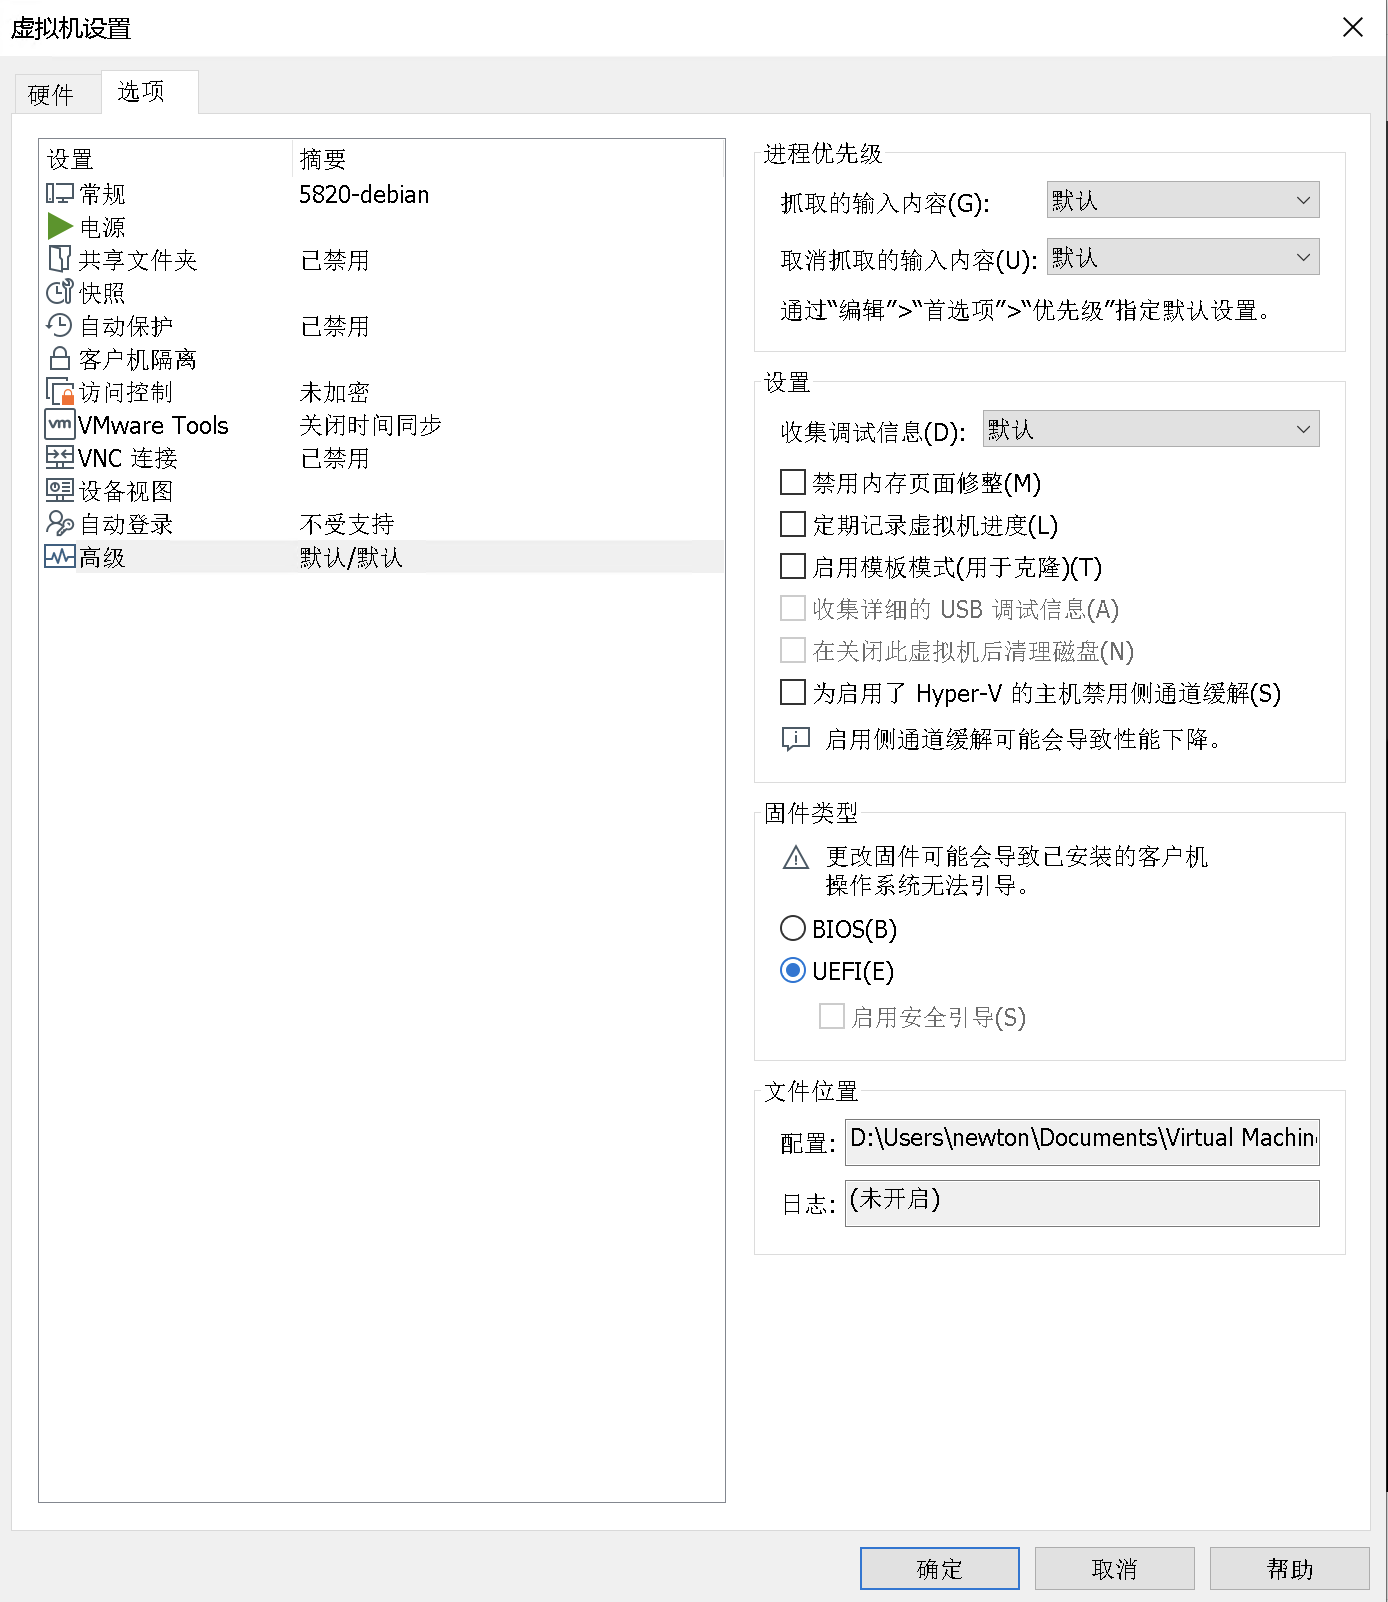
VMware Workstation Pro:需要手动设置 UEFI 环境,如图 1 所示。
Hyper-V:默认就是 UEFI 启动。
物理机:视情况而定,用户可在 BIOS 界面将 boot 模式改为 UEFI.
重要提醒
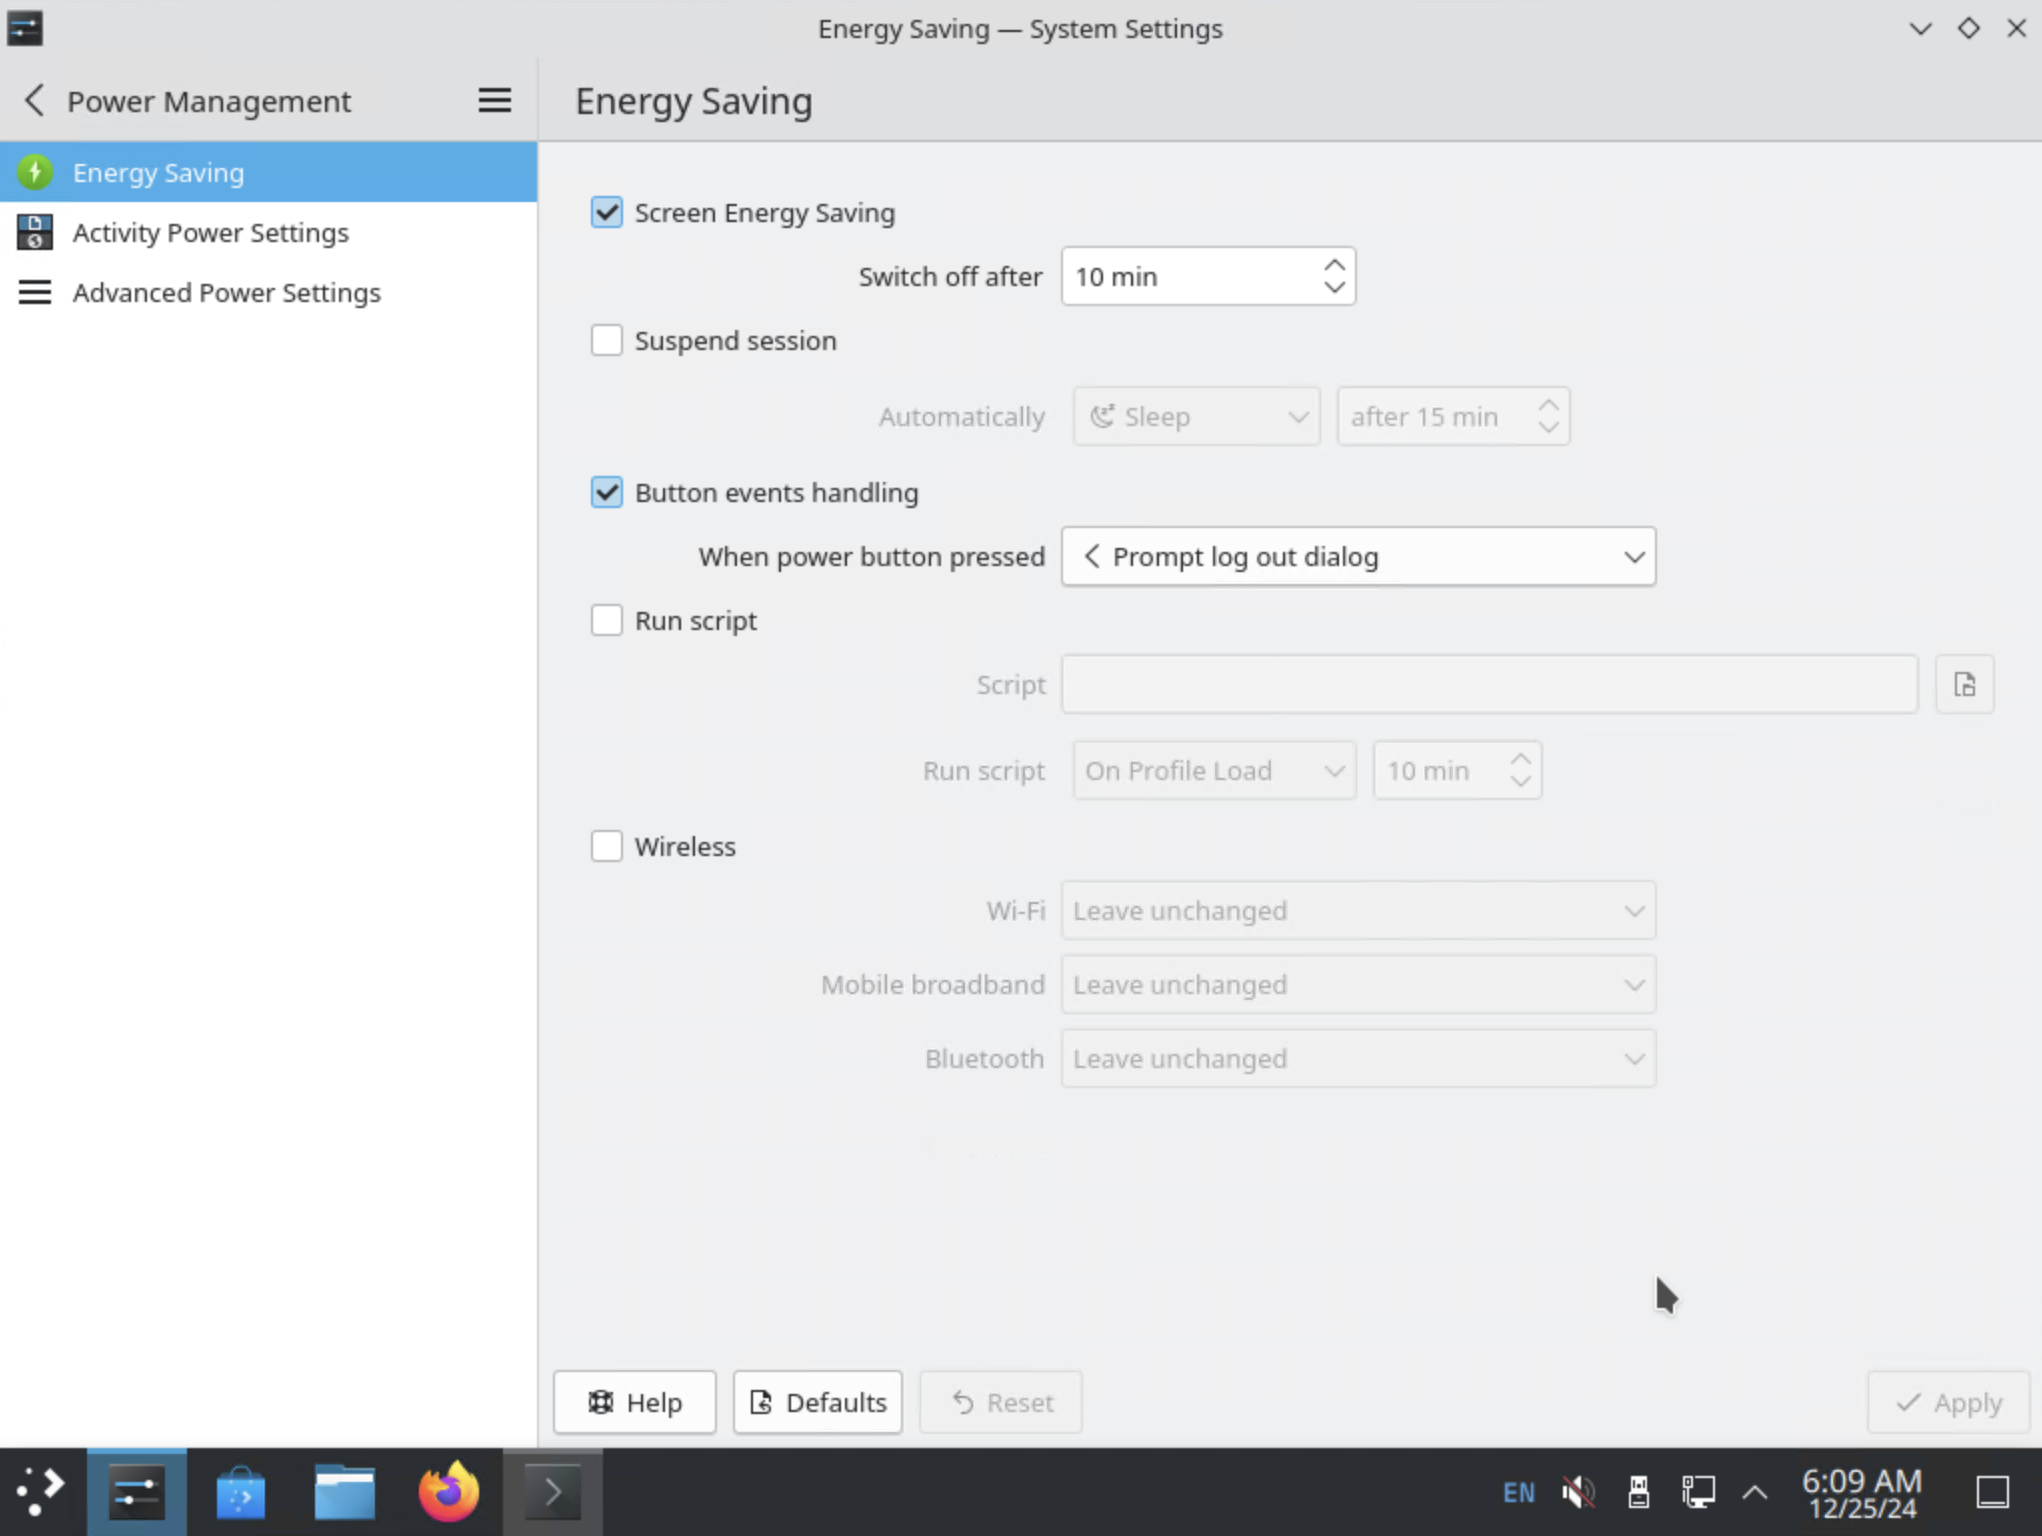
设置好 UEFI 引导后,即可使用 LiveCD 进入临时系统。注意,LiveCD 桌面环境会自动节能休眠,而且无视 SSH 会话,因此若以图形化方式进入 LiveCD,请开机后首先在 Energy Saving 菜单里关闭 Session Suspend 选项。在配置系统途中发生省电休眠,将会导致前功尽弃 !
ZFSBootMenu 是一个特殊的 bootloader,它依赖 EFI 启动分区,因此 legacy 模式不支持。进入 LiveCD 后,执行下列命令二次确认 系统是否处于 EFI 模式:
1 sudo dmesg | grep -i efivars
如果输出类似下面的文本,则证明环境满足要求。
1 [ 0.301784] Registered efivars operations
启动之后,user 用户默认有 admin 权限,执行下列命令,安装 openssh-server:
1 sudo apt install openssh-server
LiveCD 临时环境的用户信息如下。
默认用户:user
user 的默认密码:live。
随后查看 IP 地址,在终端机发起远程连接即可。
2. 配置 Live 环境·
进入系统后,需要切换到 root 用户,本文的后续命令均以 root 身份执行.
2.1 获取环境变量·
1
2
source /etc/os-releaseexport ID
ID 一般是 debian,后续安装会用到。
2.2 配置 APT·
执行下列命令,配置 APT 上游。
1
2
3
4
5
6
7
8
9
10
11
12
13
sudo tee /etc/apt/sources.list > /dev/null << EOF deb http://deb.debian.org/debian bookworm main contrib non-free non-free-firmware deb-src http://deb.debian.org/debian bookworm main contrib non-free non-free-firmware deb http://security.debian.org/debian-security bookworm-security main contrib non-free non-free-firmware deb-src http://security.debian.org/debian-security bookworm-security main contrib non-free non-free-firmware deb http://deb.debian.org/debian bookworm-updates main contrib non-free non-free-firmware deb-src http://deb.debian.org/debian bookworm-updates main contrib non-free non-free-firmware deb http://deb.debian.org/debian bookworm-backports main contrib non-free non-free-firmware deb-src http://deb.debian.org/debian bookworm-backports main contrib non-free non-free-firmware EOF
随后配置 LiveCD 环境的软件安装优先级:
1
2
3
4
5
6
7
8
9
sudo tee /etc/apt/preferences.d/stable > /dev/null << EOF Package: * Pin: release a=stable Pin-Priority: 900 Package: src:zfs-linux Pin: release n=bookworm-backports Pin-Priority: 990 EOF
软件包优先级问题
ZFS 的最新版位于 backport channel,因此我们将 backport 的优先级设置得比 stable 高,方便安装最新的 OpenZFS 代码。
随后更新系统包索引:
3. 在 Live 环境中安装 ZFS·
为了进行 ZFS 文件系统创建,先要安装 ZFS 相关内核模块和用户态工具。
1
2
apt install debootstrap gdisk dkms linux-headers-$(uname -r) apt install zfsutils-linux
3.1 生成准备文件·
在开机挂载 ZFS 文件系统时,ZFS 会主动对比本机 hostid 与上一次挂载本 pool 的系统的 hostid,如果两者相同则自动导入 pool,否则需要用户手动导入。因此,为了让 ZFSBootMenu 和 Debian 自动导入 pool,可以通过以下命令生成固定的 hostid。
1 zgenhostid -f 0x00bab10c
3.2 磁盘分区·
假设目标磁盘是 /dev/nvme0n1,执行下列命令设置环境变量:
1 2 3 4 5 6 7 8 9 10 11 12 TARGET_DRIVE="/dev/nvme0n1" export BOOT_DISK=$TARGET_DRIVE export BOOT_PART="1" export BOOT_DEVICE="${BOOT_DISK} p${BOOT_PART} " export POOL_DISK=$TARGET_DRIVE export POOL_PART="2" export POOL_DEVICE="${POOL_DISK} p${POOL_PART} "
对于非 NVMe 硬盘
1 2 3 4 5 6 7 8 9 10 11 12 TARGET_DRIVE="/dev/sda" export BOOT_DISK=$TARGET_DRIVE export BOOT_PART="1" export BOOT_DEVICE="${BOOT_DISK} ${BOOT_PART} " export POOL_DISK=$TARGET_DRIVE export POOL_PART="2" export POOL_DEVICE="${POOL_DISK} ${POOL_PART} "
用户可自行调整目标磁盘,本文默认在独立的一个 NVMe 硬盘上安装系统,若 EFI 分区和操作系统不在同一个磁盘,请自行解决。
复杂的 RAIDZ 启动盘
对于某些严肃场景,建议在 mirror 模式的磁盘组上安装系统。比如有两个一样的磁盘 /dev/nvme0n1 和 /dev/nvme1n1,可做如下操作:
使用 nvme-cli 相关命令,将两个磁盘的 LBAF 均设置为 4Kn 模式;
对两个盘做相同的分区,如 1MB:512MB(ESP):SYS:10MB 布局,
ESP 存储在 512M 的小分区中;手动对两个磁盘的 ESP 做镜像同步。
多个 SYS 分区互为镜像,随后安装操作系统。
执行下列命令清空磁盘:
1
2
3
4
5
6
7
8
zpool labelclear -f "$POOL_DISK " wipefs -a "$POOL_DISK " wipefs -a "$BOOT_DISK " sgdisk --zap-all "$POOL_DISK " sgdisk --zap-all "$BOOT_DISK "
随后创建 EFI 系统分区(EFI System Partition,下称 ESP)和存储池主分区:
1
2
sgdisk -n "${BOOT_PART} :1m:+512m" -t "${BOOT_PART} :ef00" "$BOOT_DISK " sgdisk -n "${POOL_PART} :0:-10m" -t "${POOL_PART} :bf00" "$POOL_DISK "
分区详解
分区大小
:1m:+512m 表示从磁盘的 1MB 开始,往后再数 512MB 空间,这是一般 EFI 分区的容量:0:-10m 表示从剩余空间的最开始,到最后剩余 10MB 的所有空间,这部分容量非常大。
ef00 和 bf00 是不同的分区类型
ef00:GPT 分区类型代码,表示类行为 EFI 系统分区(ESP)。bf00:GPT 分区类型代码,表示 Solaris Reserved (ZFS)。
如上图所示:
ESP 从 1MB 开始,所以前面有 1MB 空闲空间。ESP 的起始扇区是 $\frac{1 \times 1024 \times 1024}{512}=2048$,因为磁盘是 512e 模式,所以分母是 512.
剩余 19938 个扇区,约 10MB 空间
4. 在 Live 环境中创建 ZFS 存储·
4.1 创建存储池·
1
2
3
4
5
6
7
8
9
zpool create -f \ -o ashift=12 \ -O compression=lz4 \ -O acltype=posixacl \ -O xattr=sa \ -O relatime=on \ -o autotrim=on \ -o compatibility=openzfs-2.3-linux \ -m none zroot "$POOL_DEVICE "
兼容性
在 /usr/share/zfs/compatibility.d/ 目录下存储了大量的 OpenZFS 兼容性参数集合,其中 openzfs-2.3-linux 和 openzfs-2.3-freebsd 是相同的,由此可见 Linux 支持的 ZFS 特性非常全面。openzfs-2.3-linux 具体内容如下:
1
2
3
4
5
6
7
8
9
10
11
12
13
14
15
16
17
18
19
20
21
22
23
24
25
26
27
28
29
30
31
32
33
34
35
36
37
38
39
40
41
42
43
44
45
# Features supported by OpenZFS 2.3 on Linux and FreeBSD allocation_classes async_destroy blake3 block_cloning bookmark_v2 bookmark_written bookmarks device_rebuild device_removal draid edonr embedded_data empty_bpobj enabled_txg encryption extensible_dataset fast_dedup filesystem_limits head_errlog hole_birth large_blocks large_dnode large_microzap livelist log_spacemap longname lz4_compress multi_vdev_crash_dump obsolete_counts project_quota raidz_expansion redacted_datasets redaction_bookmarks redaction_list_spill resilver_defer sha512 skein spacemap_histogram spacemap_v2 userobj_accounting vdev_zaps_v2 zilsaxattr zpool_checkpoint zstd_compress
4.2 创建 ZFS 文件系统·
根据后续系统启动行为,给对应的三个 ZFS 数据集设置如下挂载点:
1
2
3
4
5
zfs create -o mountpoint=none zroot/ROOT zfs create -o mountpoint=/ -o canmount=noauto zroot/ROOT/${ID} zfs create -o mountpoint=/home zroot/home zpool set bootfs=zroot/ROOT/${ID} zroot
4.3 指定临时挂载点·
现在需要在 ZFS 上安装 debian rootfs 和内核,所以需要将数据集挂载到合适的挂载点:
1
2
3
4
zpool export zroot zpool import -N -R /mnt zroot zfs mount zroot/ROOT/${ID} zfs mount zroot/home
输入下列命令进行验证:
输出应该类似:
1
2
zroot/ROOT/debian on /mnt type zfs (rw,relatime,xattr,posixacl) zroot/home on /mnt/home type zfs (rw,relatime,xattr,posixacl)
4.4 更新设备符号链接·
udevadm 是一个 Linux 用户空间工具,用于管理和操作 udev(用户空间设备管理器)。它是 Linux 系统设备管理的核心工具之一,提供了与设备文件(如 /dev/sda、/dev/tty)和设备事件相关的功能。
udevadm 的功能
设备管理
提供对内核设备的事件和设备属性的访问。
动态生成和管理 /dev 目录中的设备文件。
事件触发与处理
捕获内核发送的设备事件(如设备插入、拔出)。
执行用户定义的规则(udev 规则)来管理设备行为。
调试与分析
可用于调试设备事件和规则的执行。
提供设备信息查询和规则测试。
5. 安装 Debian 系统·
5.1 安装 Debian 基础系统·
1 debootstrap bookworm /mnt
5.2 拷贝 LiveCD 中的有效文件·
1 2 cp /etc/hostid /mnt/etc cp /etc/resolv.conf /mnt/etc
5.3 chroot 到新系统·
1 2 3 4 5 6 mount -t proc proc /mnt/proc mount -t sysfs sys /mnt/sys mount -B /dev /mnt/dev mount -t devpts pts /mnt/dev/pts chroot /mnt /bin/bash
自此,接下来的所有操作均是在新系统中进行,请务必谨慎操作。
5.4 配置新系统·
5.4.1 设置主机名和解析·
1 2 3 4 5 6 7 8 9 10 11 12 13 14 15 16 17 18 19 bash -c ' # 交互式输入主机名 read -p "Enter hostname: " MY_HOSTNAME # 检查是否输入 if [[ -z "$MY_HOSTNAME" ]]; then echo "Error: Hostname cannot be empty." exit 1 fi echo $MY_HOSTNAME > /etc/hostname echo -e "127.0.1.1\t$MY_HOSTNAME" >> /etc/hosts # 显示更新结果 echo "Current /etc/hostname:" cat /etc/hostname echo "Current /etc/hosts:" grep "127.0.1.1" /etc/hosts '
5.4.2 设置 root 密码·
5.4.3 配置新系统 APT·
添加 APT 源信息。
1 2 3 4 5 6 7 8 9 10 11 12 13 tee /etc/apt/sources.list > /dev/null << EOF deb http://deb.debian.org/debian bookworm main contrib non-free non-free-firmware deb-src http://deb.debian.org/debian bookworm main contrib non-free non-free-firmware deb http://security.debian.org/debian-security bookworm-security main contrib non-free non-free-firmware deb-src http://security.debian.org/debian-security bookworm-security main contrib non-free non-free-firmware deb http://deb.debian.org/debian bookworm-updates main contrib non-free non-free-firmware deb-src http://deb.debian.org/debian bookworm-updates main contrib non-free non-free-firmware deb http://deb.debian.org/debian bookworm-backports main contrib non-free non-free-firmware deb-src http://deb.debian.org/debian bookworm-backports main contrib non-free non-free-firmware EOF
配置上游优先级:
1 2 3 4 5 6 7 8 9 10 11 12 13 14 15 16 17 tee /etc/apt/preferences.d/stable > /dev/null << EOF Package: * Pin: release a=stable Pin-Priority: 900 Package: * Pin: origin "deb.nodesource.com" Pin-Priority: 950 Package: * Pin: origin "download.docker.com" Pin-Priority: 950 Package: * Pin: origin "pkgs.tailscale.com" Pin-Priority: 950 EOF
优先使用 backport 中的 ZFS 模块:
1 2 3 4 5 tee /etc/apt/preferences.d/90_zfs > /dev/null << EOF Package: src:zfs-linux Pin: release n=bookworm-backports Pin-Priority: 990 EOF
apt 执行时显示包版本:
1 2 3 tee /etc/apt/apt.conf.d/99show-versions > /dev/null << EOF APT::Get::Show-Versions "true"; EOF
5.4.4 安装新软件·
在新的系统中安装若干个基础组件,比如 sudo、openssh-server 和基本的 locale 数据。
1 2 3 apt update apt install locales keyboard-configuration console-setup openssh-server sudo dpkg-reconfigure locales tzdata keyboard-configuration console-setup
5.4.5 配置常规用户·
1 2 3 4 5 6 7 8 9 10 11 12 13 14 15 16 17 18 19 20 21 22 23 24 25 26 27 28 29 30 31 32 33 34 35 bash -c ' read -p "User ID (default: 1000): " USER_ID USER_ID=${USER_ID:-1000} read -p "User name (default: newton): " NEW_USERNAME NEW_USERNAME=${NEW_USERNAME:-newton} useradd -u "$USER_ID" -m -s /bin/bash "$NEW_USERNAME" if [ $? -eq 0 ]; then echo "User $NEW_USERNAME has been successfully created with user ID $USER_ID." else echo "Error: Failed to create user $NEW_USERNAME." exit 1 fi # 配置该用户的密码 passwd $NEW_USERNAME # 修改 sudoer 文件,使新用户具有高级权限: echo "$NEW_USERNAME ALL=(ALL:ALL) NOPASSWD: ALL" | tee -a /etc/sudoers > /dev/null # 使用 visudo 检查语法 visudo -cf /etc/sudoers if [ $? -eq 0 ]; then echo "Sudoer entry for ' newton' has been successfully added and verified with visudo." else echo "Error: Syntax check failed. Rolling back changes." # 回滚操作(备份文件或删除最后一行) sed -i ' $d ' /etc/sudoers exit 1 fi '
6. 配置 ZFS 参数·
6.1 在新系统中安装 ZFS·
1 2 apt install linux-headers-amd64 linux-image-amd64 zfs-initramfs dosfstools efibootmgr echo "REMAKE_INITRD=yes" > /etc/dkms/zfs.conf
开启 ZFS 相关服务:
1 2 3 4 systemctl enable zfs.target systemctl enable zfs-import-cache systemctl enable zfs-mount systemctl enable zfs-import.target
重建 initramfs:
1 update-initramfs -c -k all
-c: 创建一个新的 initramfs 文件,而不是更新现有的文件。-k: 指定要处理的内核版本。all 表示对所有已安装的内核进行处理。
7.1 设置 zroot/ROOT 参数·
1 2 zfs set org.zfsbootmenu:commandline="quiet" zroot/ROOT
7.2 创建 ESP 分区 VFAT 文件系统·
1 mkfs.vfat -F32 "$BOOT_DEVICE "
创建 /etc/fstab 表项并挂载:
1 2 3 4 5 6 cat << EOF >> /etc/fstab $( blkid | grep "$BOOT_DEVICE" | cut -d ' ' -f 2 ) /boot/efi vfat defaults 0 0 EOF mkdir -p /boot/efimount /boot/efi
首先下载并拷贝 ZFSBootMenu 预编译二进制文件:
1 2 3 4 5 apt install curl mkdir -p /boot/efi/EFI/ZBMcurl -o /boot/efi/EFI/ZBM/VMLINUZ.EFI -L https://get.zfsbootmenu.org/efi cp /boot/efi/EFI/ZBM/VMLINUZ.EFI /boot/efi/EFI/ZBM/VMLINUZ-BACKUP.EFI
随后创建 EFI 启动参数:
1 2 3 4 5 6 7 8 9 mount -t efivarfs efivarfs /sys/firmware/efi/efivars efibootmgr -c -d "$BOOT_DISK " -p "$BOOT_PART " \ -L "ZFSBootMenu (Backup)" \ -l '\EFI\ZBM\VMLINUZ-BACKUP.EFI' efibootmgr -c -d "$BOOT_DISK " -p "$BOOT_PART " \ -L "ZFSBootMenu" \ -l '\EFI\ZBM\VMLINUZ.EFI'
特殊情况
笔者在实践中发现 H3C R4950 G5 服务器的 BIOS 有个特点:启动项必须是 BOOT/BOOTX64.EFI,其他的都不认。
笔者之前更新了 /boot/efi/EFI/ZBM/VMLINUZ.EFI 的版本,将 ZFSBootMenu 升级到了 3.0.1;
但是启动的时候总是提示版本太老(2.2.7),不支持 ZFS 2.3.0 存储池的许多特性。
然而笔者非常确定 /boot/efi/EFI/ZBM/VMLINUZ.EFI 是 3.0.1,因为已经对比过哈希值。
后来笔者把 /boot/efi/EFI/BOOT/BOOTX64.EFI 删了之后重启系统,发现系统提示找不到任何启动项并直接进入 UEFI 恢复 shell.
这时笔者终于知道问题在哪里了,原来是启动项必须得名字正确才可以。把 /boot/efi/EFI/ZBM/VMLINUZ.EFI 拷贝为 boot/efi/EFI/BOOT/BOOTX64.EFI,顺利启动!
BOOT/BOOTX64.EFI 是 UEFI 固件默认寻找的启动文件路径,用于在没有显式启动项的情况下引导系统。这个机制叫做 UEFI fallback boot path. 许多 OEM 机器只认这个路径,不支持自定义 EFI 目录名。
8. 准备第一次启动·
1 2 3 umount -n -R /mnt zpool export zroot reboot now
9. 其他相关·
9.1 选择内核启动·
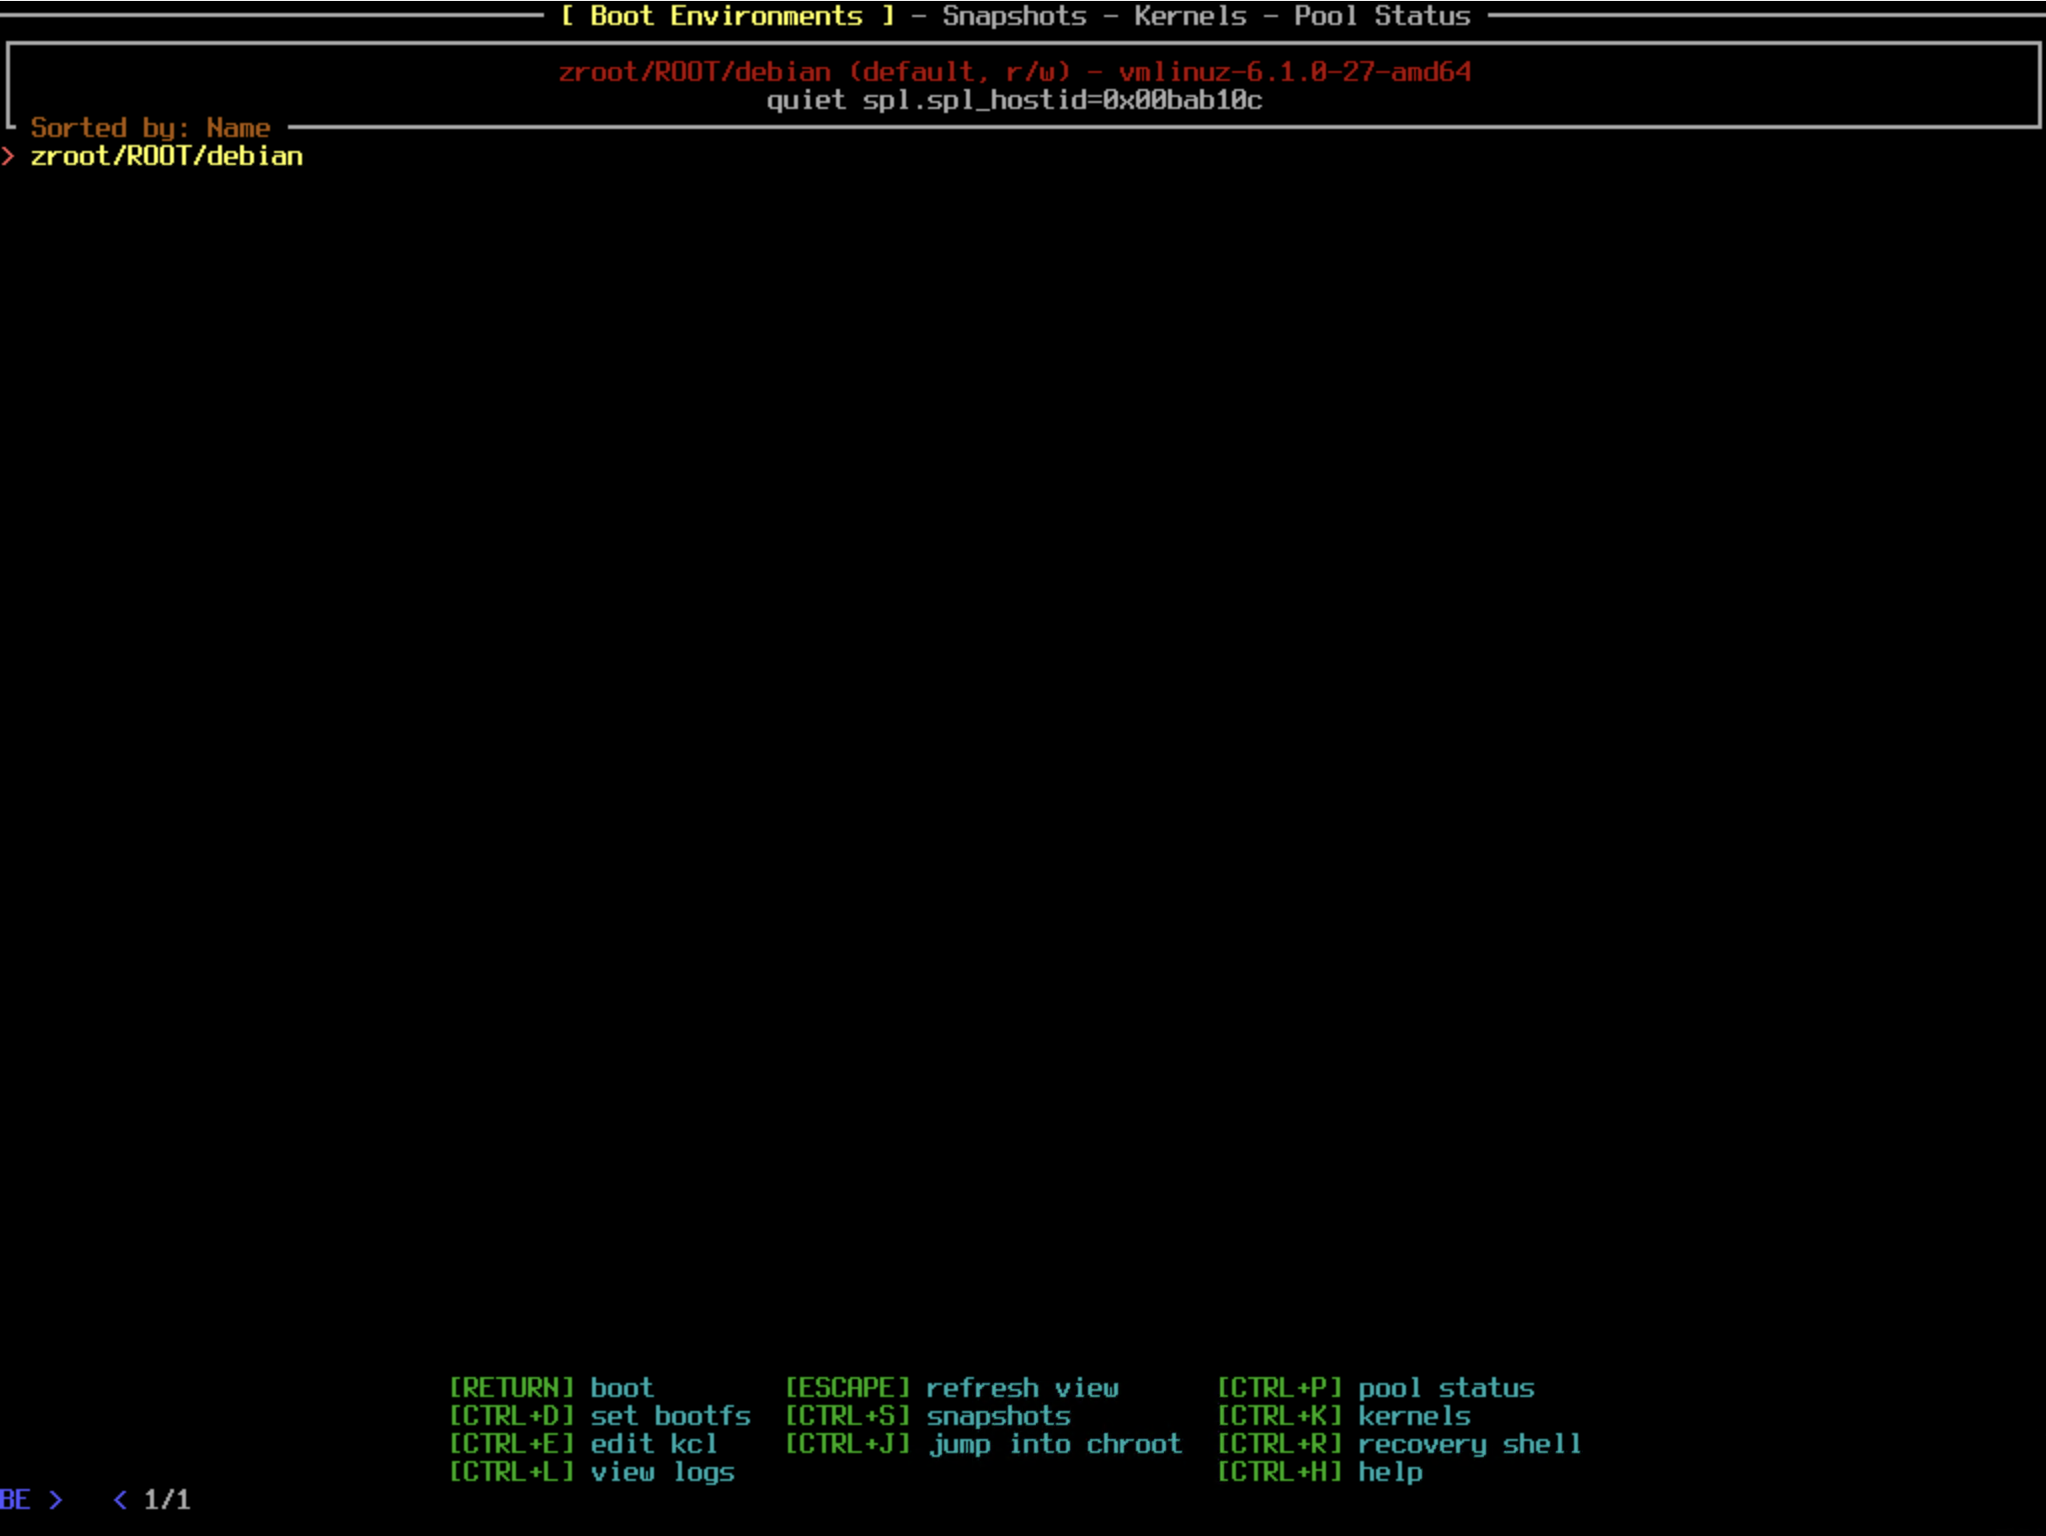
选择其他已安装的内核,需要进入 ZFSBootMenu 的界面,开机之后在 ZMB 读秒阶段按下 ESC 即可进入。
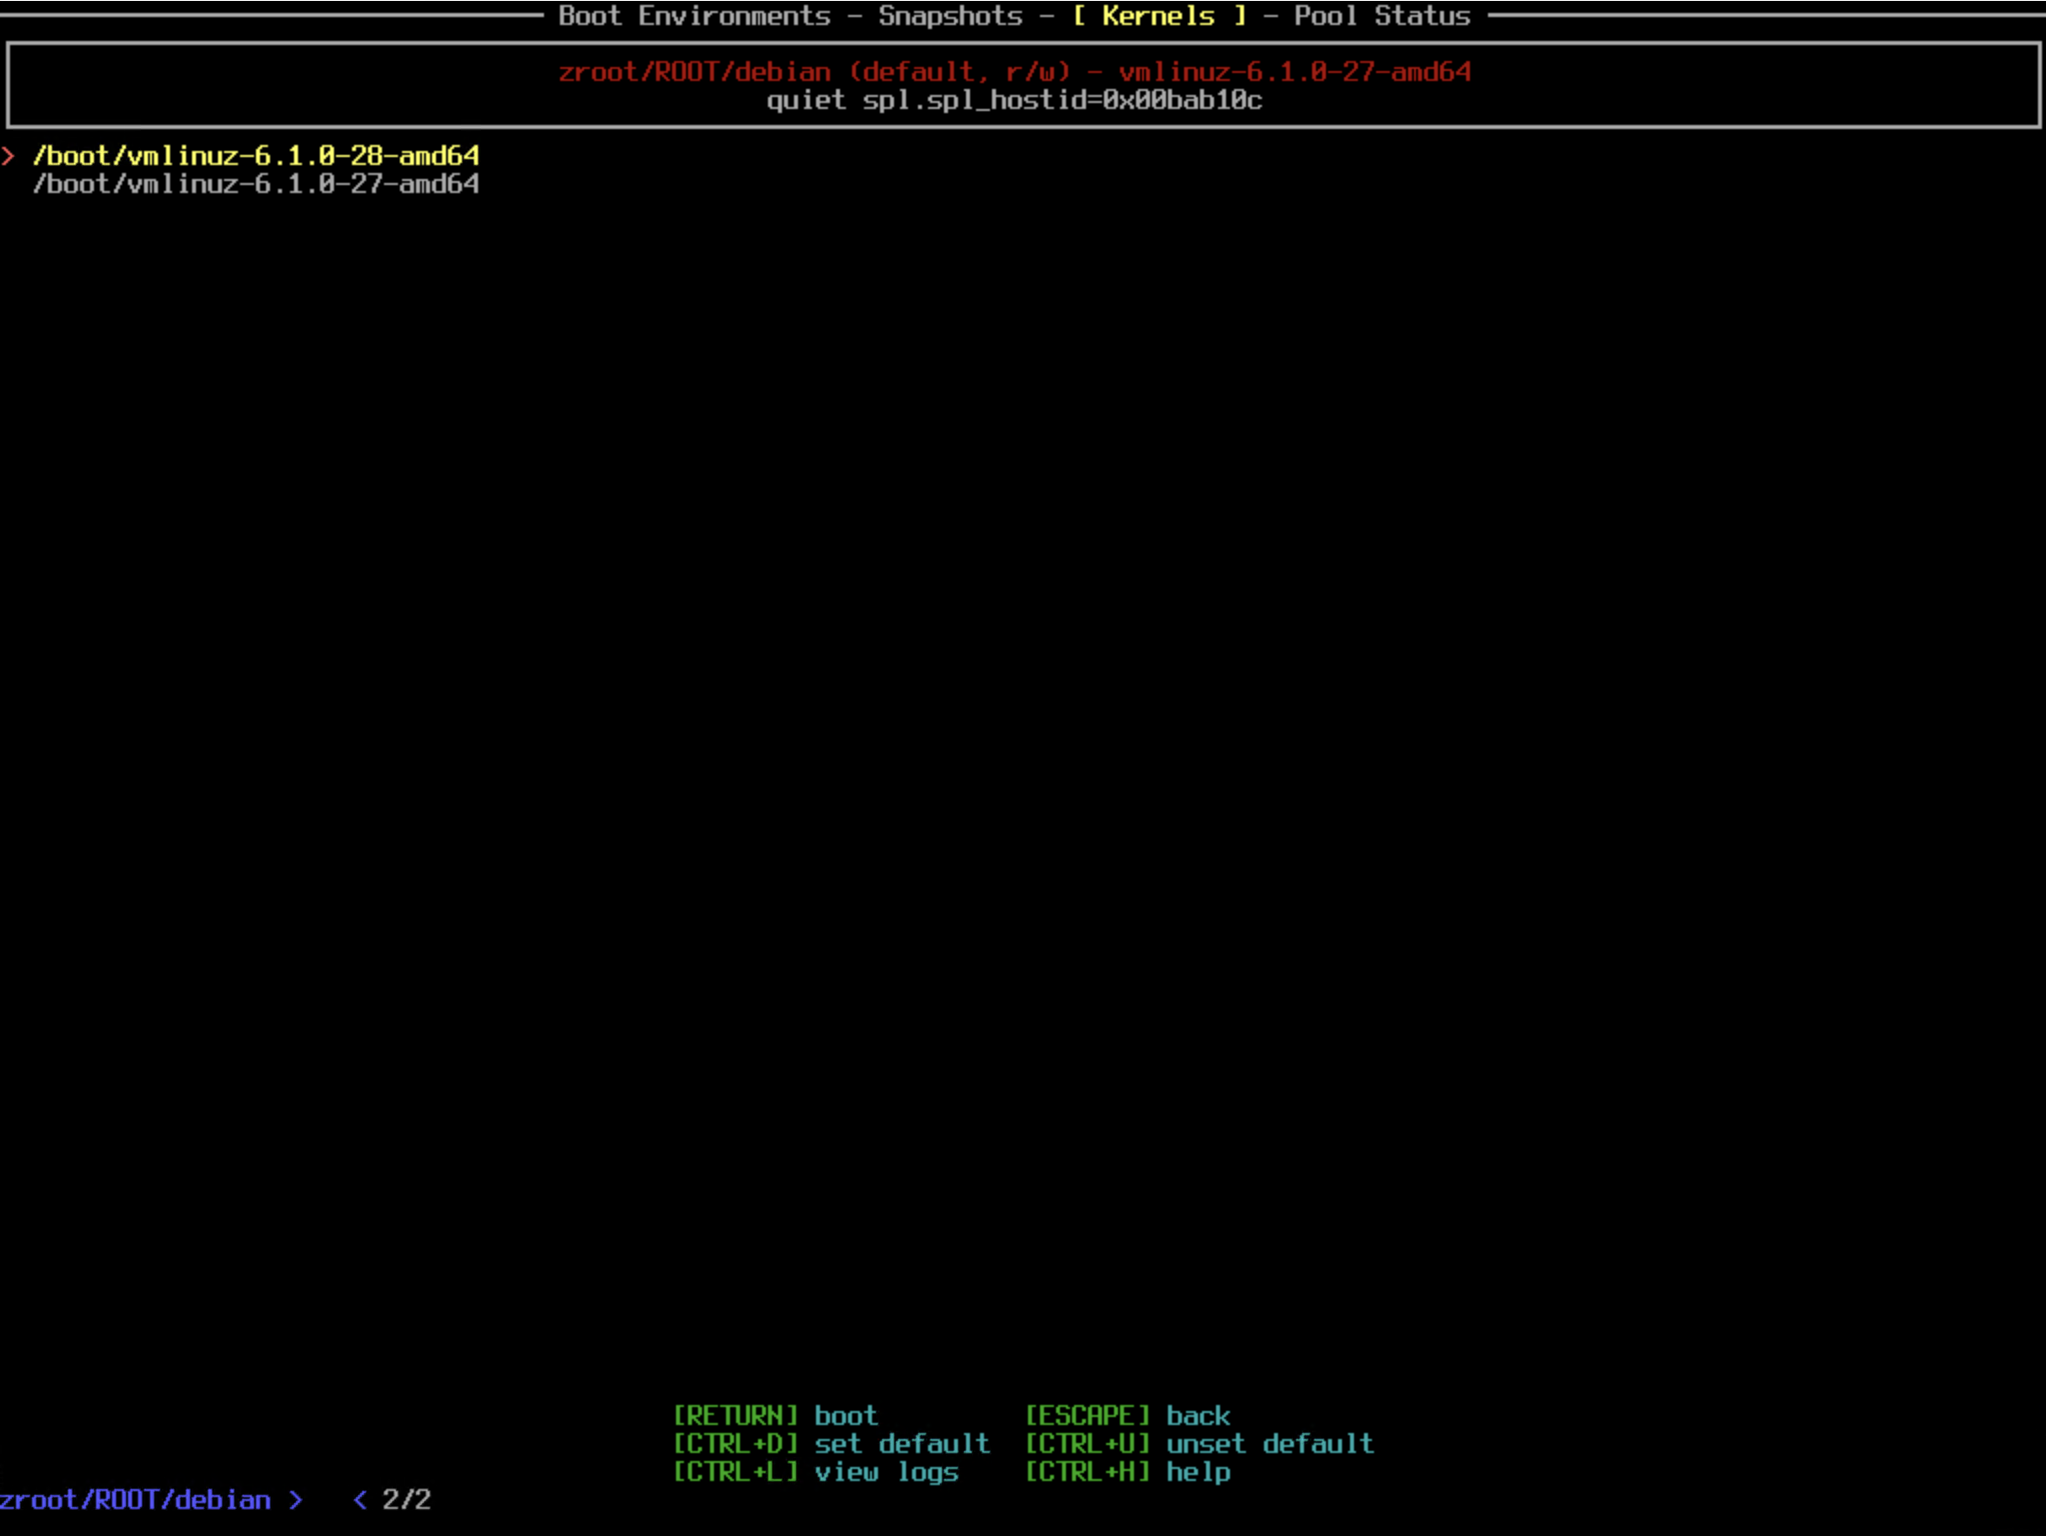
按下 Ctrl K 即可选择内核,在对应内核按下 Ctrl D 将其设置为默认启动内核。。
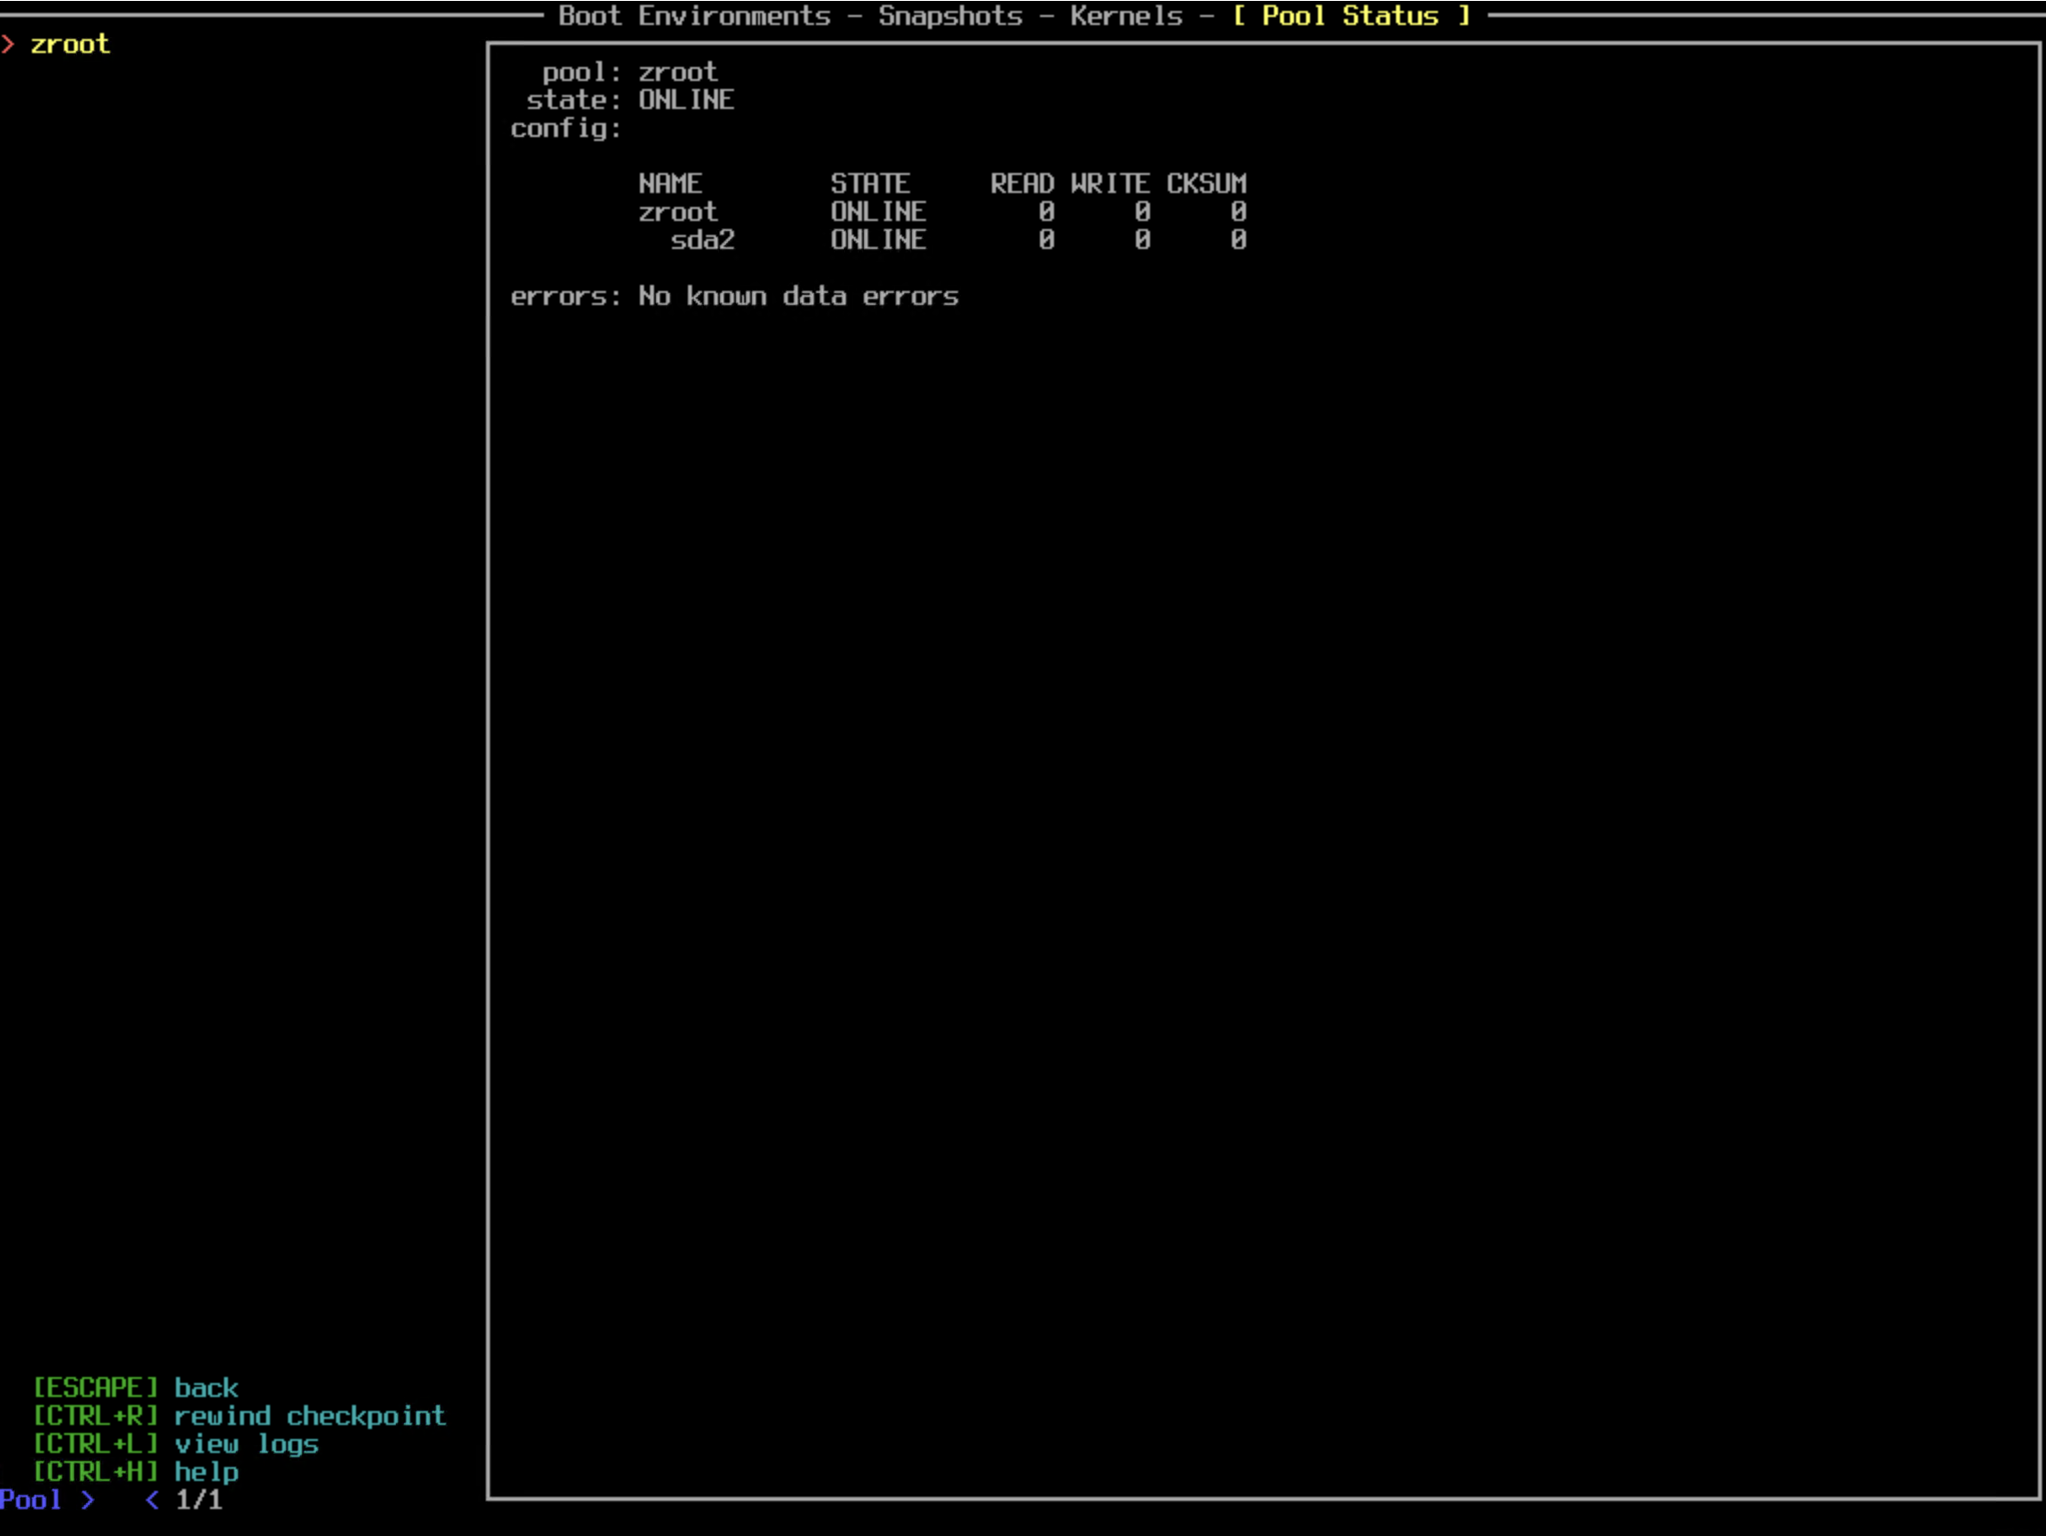
必要时候也可以在 ZFSBootMenu 里查看 ZFS 存储池。
ZFSBootMenu 的更新比较及时,一般会密切跟进最新的 OpenZFS 发行版。可在 GitHub 查看其更新记录。
提示
如果 ZBM 过旧而系统引导分区的 ZFS 版本过新,则有可能出现 ZBM 无法引导系统的问题。
强烈建议在升级系统存储池的 ZFS 版本之前,先升级 ZBM,以防无法开机!
如果按照本文流程正常安装,则 EFI 将会自动挂载到 /boot/efi 路径,因此重复执行以下命令即可获取最新的 ZBM EFI 文件并以此覆盖旧文件:
1 2 curl -o /boot/efi/EFI/ZBM/VMLINUZ.EFI -L https://get.zfsbootmenu.org/efi cp /boot/efi/EFI/ZBM/VMLINUZ.EFI /boot/efi/EFI/ZBM/VMLINUZ-BACKUP.EFI
如果你没有按照本文流程安装,则可手动挂载 vfat32 分区到合适的挂载点,然后下载最新文件以覆盖旧文件。
由于 EFI 启动项并非常规的可执行文件,因此验证其版本较为困难,可使用下列命令查看其中嵌入的字符串并搜索内核版本:
1 2 3 strings /boot/efi/EFI/ZBM/VMLINUZ.EFI | grep '6\.6\.74' | wc -l
如果上述命令的输出值大于 1,基本可以说明更新成功。
10. 已知问题·
10.1 虚拟机环境下启动盘体积过大·
笔者在实际使用过程中发现,如果使用 ZFSBootMenu 安装 Debian,则 root 分区所在的虚拟磁盘会因为 ZFS 的 CoW 写入模式迅速膨胀。比如其 USED 只有 40GiB,但 Hyper-V 的虚拟磁盘竟然高达 250GiB,这使得宿主机的存储压力非常大。笔者推测,该现象可能与 systemd-journald 产生的大量小块追加写入有关。在 ZFS 的 CoW 机制下,这类写入容易导致底层虚拟磁盘出现高度离散的已分配块,从而使 Hyper-V 的稀疏磁盘压缩算法失效。
解决方案比较繁琐。笔者只能定期地对 zroot 存储池进行搬迁。具体步骤如下:
先给虚拟机分配一个同容量的空白虚拟磁盘;
对比 zroot 所在磁盘的分区表进行分区,创建 EFI 分区;
取消原有 EFI 分区的挂载,挂载新的 EFI 分区并在其中安装 ZMB;
在新磁盘的大分区中创建 zroot2 存储池,用以承载 ROOT 和 home 数据;
使用 ZFS replication 功能将 zroot 存储池全部发送到新磁盘的 zroot2 存储池。此时 zroot2 和原来的 zroot 保持内容完全一致。
移除虚拟机的旧磁盘,然后以 zroot2 为根分区进行启动。
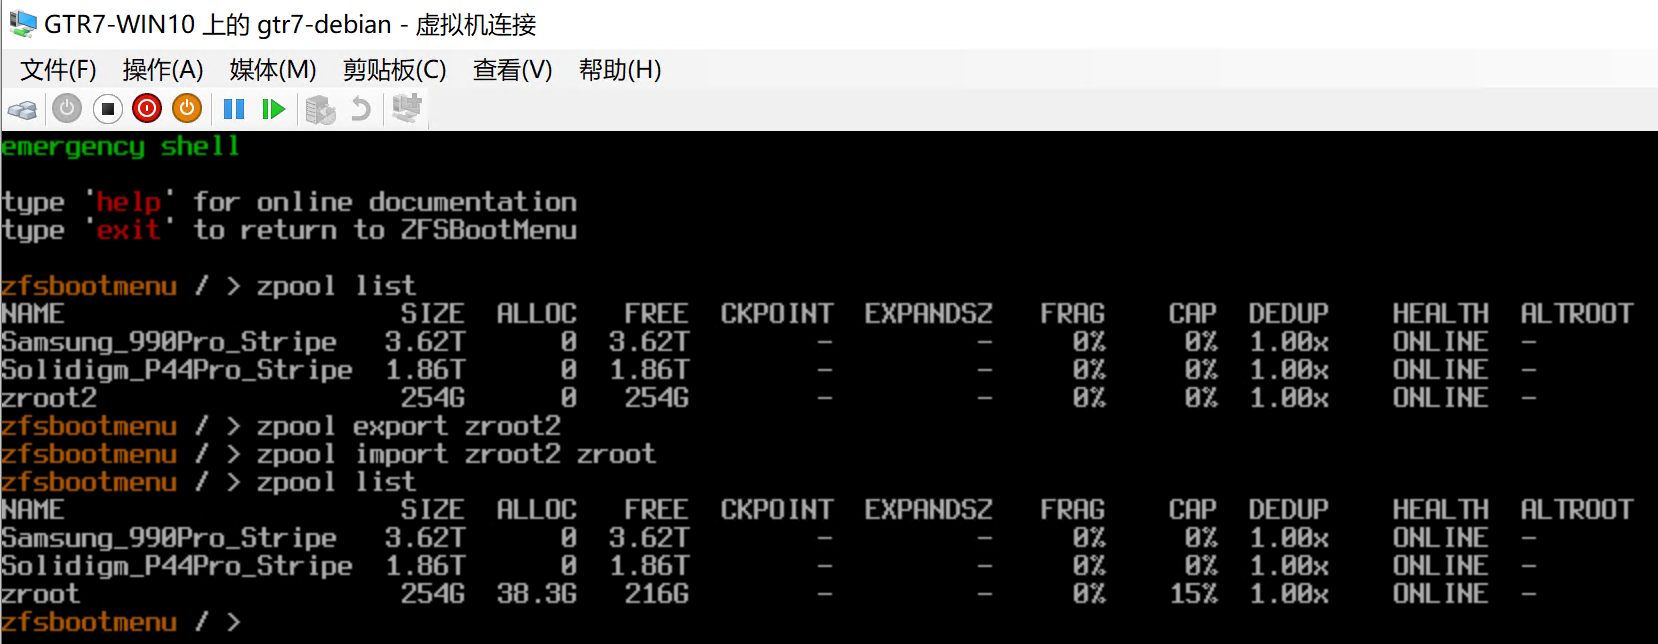
(optional) 如果用户不满意 zroot2 这个名字,还可以在 ZMB 的恢复 shell 里对它重命名,如下图所示。
需要注意的是,该问题主要体现在虚拟磁盘文件的物理占用空间上,ZFS 存储池本身的 USED 并未异常增长。实质上,该修复过程相当于对 ZFS 数据进行一次重新打包,以消除长期 CoW 写入所造成的底层块碎片。
本文详细介绍了使用 ZFSBootMenu 安装 Debian bookworm 的全过程。ZBM 是一个很有趣的项目,可以实现非常强大的操作系统管理能力。自此,在配置开发环境前,可以先打一个快照防止现有环境被破坏。总体来看这个稍显复杂的安装过程是值得的。
